 Tor is making mainstream news as of late with several large public interest stories – but you won’t be able to use Tor on your Chrome OS device without getting creative.
Leaked NSA documents, drug raids, and bitcoin have all brought online anonymity to international attention. With such a focus, there is a lot of renewed interest in the Tor project from both the technology savvy and the average user. It shouldn’t be any surprise that as Chrome OS devices are becoming more popular, the streams are beginning to cross and as a result there is great interest in getting Tor working on Chrome OS.
Tor is designed to offer a layer of anonymity [when using the web]
Let’s start by defining Tor in relation to the content of this article.
Tor is a network designed to offer a layer of anonymity by routing your traffic through several other computers before exiting to the open web. I would strongly suggest doing some additional research on how Tor works if you’re not already familiar – while initially overwhelming, it can be a fantastic tool to use.
Chrome OS currently offers support for several VPN connections, but no way to connect to the Tor network natively from the stock network interface. That isn’t meant to imply the team hasn’t considered it – a ticket first opened in July 2011 has a project member calling to combine Tor with incognito mode. In fact, work started on that very feature until it was abruptly marked as “WontFix” in September 2012. The reason cited was not related to a change of heart, but rather internal disputes over user experience and workflow challenges.
“We’re willing to put in some of the effort too.”
That ticket has recently been revived by a couple of comments from project members interested in exploring what needs to be done. A member of the Tor project also chimed in to vocalise that they would be more than happy to help where possible – a fantastic step in the right direction. Unfortunately, even if the Chrome Team opts to start working on Tor integration as a mainline feature, there will still be a period of time before support hits a stable build.
Luckily, and perhaps unsurprisingly, users of Tor are often eager to create workarounds that circumvent silly things like whether a feature exists or not. One such workaround was noted in a tutorial shared by Jose Mendoza that requires nothing more than an Android smartphone and two specific apps.
While the original tutorial can be found here, it assumes some advanced technical knowledge. For the purposes of clarity and ease of understanding, I’ve rewritten the tutorial with the blessing of the original author. Let’s take a look at what configuration is necessary to start using Tor today.
Note: This tutorial will quickly establish a Tor connection, but is not a full solution. For example, .onion sites are not accessible using this method. There may be other flaws as well, so please exercise caution.
Tutorial: Using Tor on Chrome OS
Requirements:
- A Chrome OS device
- An Android device (no root required)
- Orbot app from Google Play (see below)
- Proxy Server app from Google Play (see below)
In this walkthrough we will be installing and configuring the Android apps to work with each other, directing all traffic targeted at a specific port through the Orbot app (and thus into the Tor network), and finally updating our Chrome OS proxy settings to use that connection over the local network. You will not need any cables, but you will need both devices to be on the same local network (WiFi works well).
Installing and Configuring Orbot
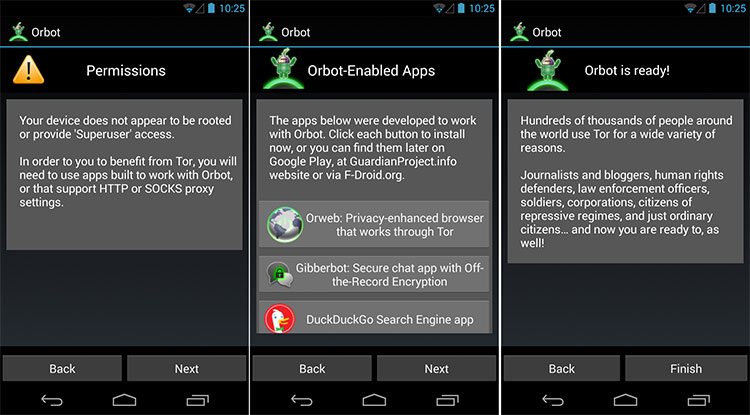
Orbot is the official Android app for the Tor project. The initial installation should be straightforward, you may select the default settings for all prompts (simply click “Next”).
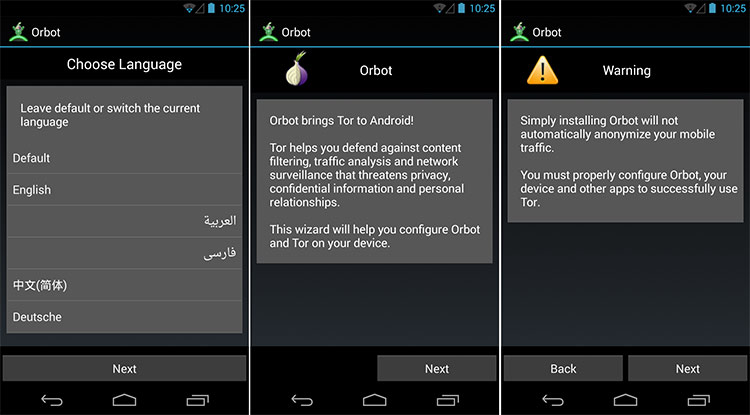
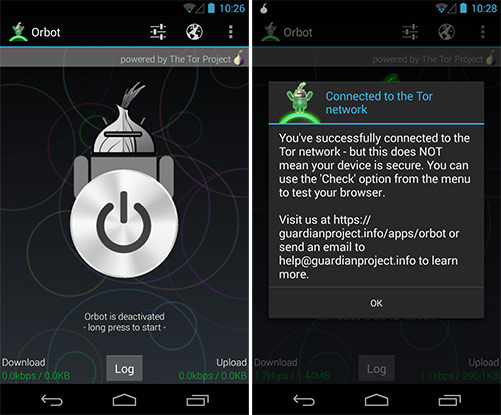
Once you’ve completed the initial setup, you’ll be shown the start screen. In order to activate the connection, you will need to long press the “power icon” in the center of the screen. That icon will glow green once successfully connected to the Tor network. Do not be concerned if the initial connection takes some time (5 – 10 minutes).
Installing and Configuring Proxy Server App
In this tutorial we will be using an app called “Proxy Server”, but almost any Android app that creates a configurable proxy server will work. The initial installation should be straightforward, and will land you on a screen with a menu bar. On that screen, click “add” followed by “proxy server”. Now we will configure the settings.
- Server Name: Tor Project
- Run on Port: 47433
- Enable the “Forward all requests to the same host” Option
- Forward to Host: localhost
- Forward to Port: 8118
- Click the Back Button, Save Settings
Note: When configuring the Port as 8118, I had issues with only being able to type 3 digits. To solve this, I clicked the “back” button, saved my settings, and then edited the server listing I had just created. This allowed me to add the final “8” to the port number.

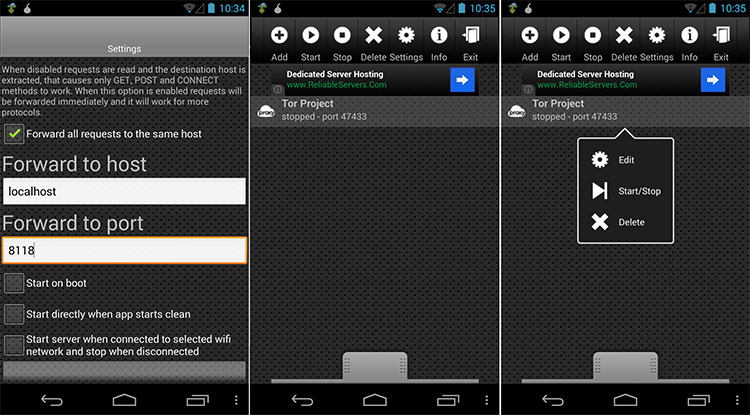
Once you’ve saved your settings, you’ll be redirected back to the main screen where a new item titled “Tor Project” will have been created. Click on it to invoke the menu, then click “Start”. You’ll receive a prompt informing you that the server has started.
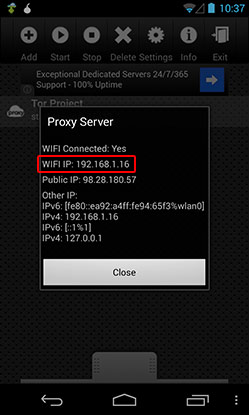
Lastly, you’ll want to click the “Info” icon in the top menu bar. This screen will display information about your device’s connection. Pay careful attention to the “WiFi IP” address – you’ll need this in the next step.
Configuring Chrome OS
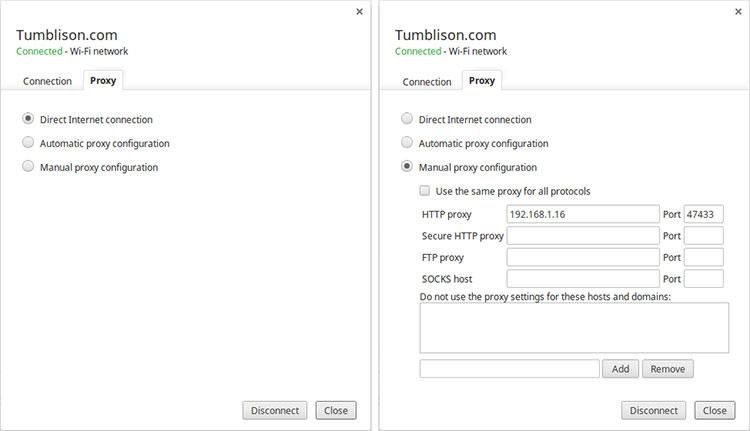
Chrome OS makes it rather easy to add and remove proxy servers, so this should be a breeze. Simply visit your settings page (chrome://settings/), click on your WiFi connection and navigate to the Proxy Tab. From there select “Manual Configuration”, then in the HTTP proxy field enter the WiFi IP Address from the Proxy Server app and the Port from the Proxy Server App (47433). Once completed, you’re on to the next step!
Verifying a Successful Result
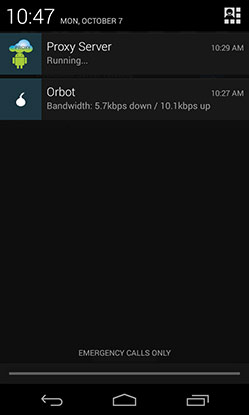
As a final step, you’ll want to make sure that everything is working properly. The easiest way to check is to visit a site like What’s my IP and see if the reported location differs from your actual location. You may also check the notification tray of your Android device for Orbot’s ongoing traffic rate.
Final Thoughts
Regardless of whether the Tor project is of use to you, there are thousands of people around the world that rely on it for safe web browsing. At the moment, those people are turning to other operating systems to get the job done.
Chrome OS, with built-in verified boot and extreme sandboxing, would be a perfect candidate for a quick Tor access machine. If you agree, and would like to show your support for the inclusion of the Tor project within stock Chrome OS, hit the link below and click the “star icon” in the top left corner of the page.
The star metric is used to determine the interest in the ticket at hand; however, please do not comment on the ticket unless you have technical information to add to the discussion – anything else is considered unnecessary spam.
Safe browsing everyone.