UK mobile network GiffGaff offer some deliciously tempting data-only deals which are perfect for using with Chrome OS.
As GiffGaff are a “pay as you go” network you don’t have to get tied up in contracts. You just buy what you need when you need it.
Their data-only ‘Goodybags’ start at £5 for 500MB and go up to £12.50 for 3GB.
With a trip coming up I need to have ‘on the go’ internet access so I can work. So I’ve decided to take my 3G-toting Samsung Chromebook Series 5.
But how do you set-up GiffGaff 3G to work with a Chromebook? Is it even possible? Thankfully it is…
Setting Up GiffGaff 3G on a Chromebook
Unlike a mobile device, you can’t just slap a mobile SIM into a Chromebook and expect it to work. At least, not with GiffGaff, anyhow.
Step 1
With your GiffGaff SIM inserted in your Chromebook, and a data Goodybag active, disable WiFi and enable Mobile data.
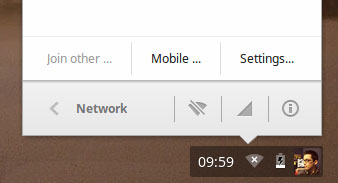
This is done by clicking on the System Tray, followed by the ‘Network’ entry (if connected to WiFi it’ll be the Wifi connection name) then toggling the Wifi and Mobile icons towards the bottom.
Click the ‘Wifi’ (cone) icon until it has a line crossed through it. Click the ‘Network’ icon so that it doesn’t have a line crossed through it.

Why are we disabling WiFi? One reason: so that we can be sure that 3G is responsible for loading pages, and not WiFi!
Step 2
With Mobile Networks now active, a window will open that ‘scans’ for mobile networks to join. It will pick-up O2. Select this, and click OK.
Step 3
The network icon will now complain that it can’t connect. Don’t worry – we’re expecting this. However, you’ll probably notice that the network name now says ‘GiffGaff’ – so we’re almost there!
Next, Open Settings from the main Chrome menu.
Under the section titled ‘Internet Connection‘ click the entry headed ‘Mobile Data’ to open the advanced mobile settings window. If a drop down appears, click the top entry to open this.
Click the menu next to ‘Access Point Name‘ and, in the menu that shows, choose ‘Other’.
All we need to do is fill out the three empty fields with the following information:
- Access Point Name: giffgaff.com
- Username: giffgaff
- Password: password
Double check that you’ve spelt everything correctly (remember the double ‘f’s’ on Giff and Gaff).
You should now be look at something like this:
If GiffGaff 3G is going to be your default mobile connection, check the ‘Automatically Connect to this Network’ box, otherwise proceed to hit ‘Connect’.

ChromeOS is smart: if you have both WiFi and Network enabled at the same time it will (typically) use Wifi as its first option.
Even so, my advice is to disable 3G when you’re not using it – if only to save on battery!

